We started a campaign that was loosely based on the Jacobite Rebellion of 1715. Ross played the Hanoverian commander, The Duke of Argyll. Paul was the Earl of Mar who raised the standard of Rebellion at Braemar in September 1715. The Rebels (Paul, Chris, Ralph and Richard) were initially successful in capturing a number of towns with little or no opposition. Aberdeen, Forfar, Dunblane, Montrose, Dundee and Perth all fell in quick succession.
 |
| The Mapboard! |
They passed by Fort William, but due to the lack of siege guns, made no impression on the fortifications. They then moved south and unable to take Stirling due to the garrison of redcoats they fell back to Dundee by mid November (campaign time), all the while gathering clansmen to their cause. By the time they clashed with the Redcoats , they had 11 Highlander clan regiments, 3 small units of Horse, a light gun and one Lowland regiment that was equipped with Pike and Shot.
 |
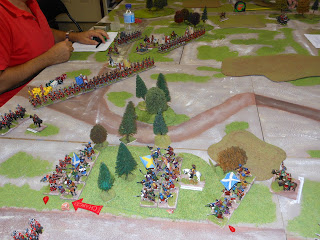
The Jacobites deploy- the Left. More units would arrive to the right and
the woods harboured two Highland units in ambush. |
The Hanoverians (Ross, Phil, Nick)had assembled a small force (5 Battalions of Foot and 3 Squadrons of Dragoons) at Newcastle and advanced into southern Scotland. The Duke (Ross) withdrew the small garrisons from Fort Augustus and Fort William to meet up with the garrison of Stirling and the advancing force from the south. When the total Hanoverian forces assembled in Stirling 6 Foot Regiments and 5 squadrons ( 1 dismounted) of Dragoons as well as one battery of guns and a battery of the newfangled Coehorn Mortars were mustered. The Duke then ordered them in pursuit of the Rebels and in the second week of November (campaign time) they met the sizable Jacobite force just west of Dundee.......
 |
The Jacobite Line-
Long live the 'True King' James III of England and VIII of Scotland! |
 |
The Hanoverians under the Duke of Argyle-
although we're calling them 'Hanoverians' all
the Regiments are really English or Scottish -
but fighting for the Hanoverian George I!
Long live the King! |
The stage was set for the first engagement of our campaign of the Rebellion of the '15!
 |
The Troops are deployed- Let the Carnage Begin!
Jacobites on the right- Hanoverians on the left. |
Both sides had hidden deployment and when the 'screen of death' was removed the Jacobites had heavily weighted one flank and the Hanoverians were deployed through the center on their side of the table. The Duke of Argyll had his flanks secured on two woods. The Earl of Mar ( Paul) had, in consultation with his colleagues ( Ralph and Richard - aka "The Impetii") decided on a sweeping flank manoeuvre to hit the Redcoats left flank and attempt to roll up the line. Under our rules the Jacobites- being irregulars are not slowed by the rough terrain and wooded areas (see pic above). Nick's first comment was of course : 'There's not enough figures on the table'.......but that just meant there was less enemy for him to kill!! He would command the reinforcements that would arrive on the extreme Left of the Hanoverian line. Ross Commanded the 2 infantry brigades in the center and Phil commanded the Brigade of Dragoons on the Right.
 |
The Hanoverian Line- viewed from the Left Flank-
The Duke of Argyll to the right center. |
 |
| The extreme right of the Hanoverian line- the dismounted 7th Dragoons (Kerr's) enter the woods. Behind them the 6th Dragoons remain mounted- The officer waving his tricorne is the Earl of Stair (played by Phil) |
 |
| Jacobite Horse- and the Earl of Mar with his standard bearer in the background. |
For the Jacobites Richard commanded the two large brigades on the right and whose job it was to swing into the flank of the enemy. Ralph commanded the center and played George Keith 10th Earl of Marischal. Paul doubled up as the Earl of Mar and the commander of the column of reinforcements led by Rob Roy Mac Gregor. Historically it is debated if he was involved in the 1715 Rebellion....but as he turns up in the 1719 Rebellion I decided to include him.....and some people do say that Paul does look like Liam Neeson. They are deluded.
Anyway to the sound of bagpipes and some very poor (by me) and some very good (by Paul) Scottish accents the game got under way. In true Jacobite style- 'they came up in the same old fashioned way' and the Redcoats waited in the same old fashioned way.
As the Duke realised that he was facing a massive flanking manoeuvre he began to swing his troops toward the right to counter the columns of rabid and dirty Highlanders hurtling his way. They tore through the forests on the Jacobite left and came up against a dismounted squadron of the 7th Dragoons whose fire was spectacularly unsuccessful. Due to the fact that the Scots got the benefit of cover for being in the woods- the Dragoons were unable to inflict any casualties and hurriedly tried to withdraw.
 |
| The columns on the Jacobite Left. |
 |
| Into the wee woods laddie! |
 |
| The 7th Dragoons try to stop the men of Clans Cameron and Steward |
 |
| The Dragoons are pushed back- but beyond the woods the Hanoverian line waits patiently to deliver musket fire when the opportunity presents itself. The thin line of red Dragoons is about to vanish in a flurry of claymore and lochaber axe blows! |
The rabid Highlanders quickly made short work of the Dragoons and then burst into the open to find a well disciplined line of English and Scottish Regiments who fired into "the smelly horde'!
On the other side of the table a veritable 'merry go round' of cavalry skirmishers took place between the Dragoons of the Earl of Portmore (2 squadrons Portmore's Dragoons) and the units of Scottish Horse. In the end- one unit apiece was lost and the Earl of Portmore (Nick) was proud of the fact that his Dragoons had captured the 10th Earl of Marischal( Ralph). He boasted long and hard into the night but the Scots would have their revenge as Portmore allowed himself to become separated from his beloved Dragoons- and would be in turn taken prisoner by the Scots! A very disturbing state of affairs old boy!
 |
| The Mounted figure on the right is John Cameron- Chief of Clan Cameron- sends his clansmen forward- British Dragoons are behind him! The Rear unit was able to about face- the Scots won the initiative that turn- and destroy the threat to their Clan Chief!! |
 |
| The Highlanders burst out of the woods ( to the right) and charge the' Thin Red Line.' |
 |
| Scottish Horse with their prisoner (figure on the left)- the Earl of Portmore. |
It was the bitter fighting on the Jacobite left that the British Dragoons lost 2 out of their 3 units on that flank and two clan regiments were severely mauled and sent running . The Hanoverian foot survived relatively unscathed- but there were 3 clan units that were near the end of their tether so the Earl of Mar decided that discretion was the better part of valour and ordered a withdrawal- which saw the mauling of one more clan unit and the complete destruction of another Dragoon unit.
Both sides claimed victory - but it was really an indecisive action.
Of the 5 British Dragoon squadrons, 3 were gone and one had suffered very high casualties. The Clans had lost five of the highland units and one Horse unit. The Scots retreated to Forfar and then Braemar to meet up with the man that they had rebelled for!
On the day - campaign time- that this battle was taking place- the 'Old Pretender' James Francis Edward Stuart arrived at Aberdeen with a couple of Regiments of Foot( loaned from his good friend Louis XIV- who, historically, actually died 5 days before the Earl of Mar called for the Rebellion (6th Sept 1715)- but I don't let the facts get in the way of a good campaign!! ). He also had crate loads of muskets and a battery of guns and arrived to take command of the Rebellion which had been carried out in his name. As the Rebellion had not been snuffed out after the first engagement- and they performed reasonably well- Mar sent for further help from the French.......so the Rebellion has its 'True King' at it's head- they control central Scotland....and there is hope for foreign intervention.......
The Hanoverians are sending more forces and the armies are headed for a clash at Braemar- both reinforced and prepared to do damage! But that's in the next Blog!!
 |
| Center of the Jacobite line- with William Mackintosh- Laird of Borlum in command. |
 |
| The 'Thin Red Line' watches the 'smelly horde' emerge from the woods in the distance. |
 |
| Center of the Hanoverian Line- with artillery in support |
 |
| The Center again- the Coehorn Mortars in the foreground |
 |
| The extreme left of the Hanoverian line- reinforcements arrive- the 14th (Clayton's)Regt of Foot, followed by the 26th Regt....oops sorry about the product placement...I'll have to make sure that there are no cans of drink next time!! |
 |
| Closeup of the Jacobites |
 |
| The 14th Foot form a firing line and take aim! |


Fantastic guys, well done, I pity I don't live in Sydney any more otherwise I could lend support to the Stuart cause.... McDonald's from the Isles!
ReplyDeletecheers
Matt
Sunny Goulburn
Thanks Matt!..the more Tartan Clad Horde the merrier....I think the Hanoverians are in for a rough time!
ReplyDelete